

How To Make A Villager Banner
In Minecraft, a imprint is a tall block specifically made to show off a pattern or design — the perfect accompaniment for decorating an inside infinite. Yous can find banners naturally spawning in Minecraft, simply the results are limited and unimpressive, with few complex options across simple white flower banners in Woodland Mansions, or villager face banners in pillager outposts.
Fortunately, it'southward possible to arts and crafts your own banner using the right kind of dyes in the right positions. Hither'south how to do it!
Further reading
- The best games like Minecraft
- The best Minecraft mods
- Where to find Ancient Debris and Netherite Ingots in Minecraft
Step 1: Create or find a banner

First, get yourself a imprint! Yous can usually loot a banner by attacking one or attacking a villager holding ane, then inspecting what drops. Otherwise, you tin can create your ain banner easily with half-dozen segments of matching wool colors and a stick.
Step 2: Bleach the banner if necessary
You lot don't have to bleach a banner before yous start, but it'southward an selection. This gives you a white, blank slate to offset with any dyes you lot might want to add, and gets rid of existing patterns if y'all looted the banner. However, y'all will need bleach, which tin can only be created with a lab table (available with the Teaching Edition or straight commands), where you combine iii water and three sodium hypochlorite. So you lot can craft the banner with the newly created bleach to wipe it make clean.
Otherwise, we suggest just starting with white wool when crafting, since that will yield the all-time results.
Step 3: Add dyes to the banner
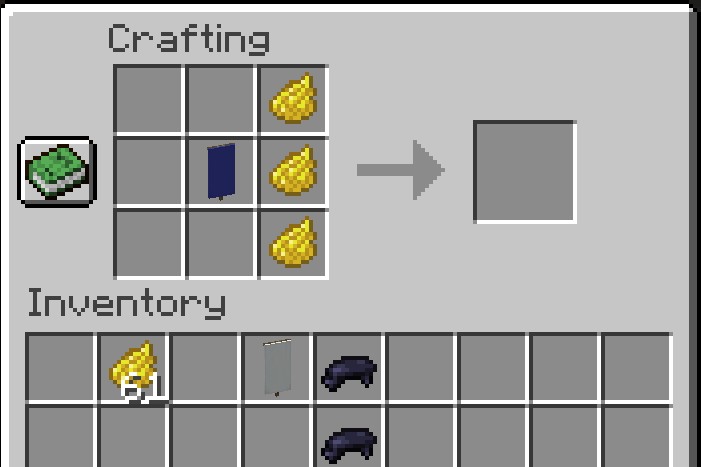
If you don't accept any dyes still, now is the time to start gathering, ownership, or crafting them. There are a full of 16 dyes you lot tin can use, and then pick the colors y'all accept in mind and get to work. Bonemeal, ink sacs, flowers, and plants are all common ingredients y'all can put in the crafting grid to yield various dyes.
When you have enough dye for your projection, it'due south fourth dimension to craft it as well. The primal is proper positioning: Where you put your banner and your dyes in the three×3 crafting grid will determine the pattern that appears on your imprint.
Most of the placements are largely intuitive, especially if y'all want to create a crest-inspired design. Popping a single dye into the corner of the crafting filigree, with the imprint in the center, will yield a square shape of color in that section. A dye in the center will create a large dot. Surrounding the imprint with dyes volition create a border of that color. You lot tin can brand a gradient by positioning dyes in the upper right and left corners and the lesser 2 middle sections of the grid. Crosses and 10's are likewise made by positioning dyes in the proper patterns. A triangle of dyes can create chevrons at the top or lesser of the banner, or diagonally dissever the banner with color depending on placement — and then on.
Special designs
You lot can also create special banner designs by adding in additional items along with a dye color for more circuitous results. These options include:
- Brick: Adding a brick will create a brick pattern. Add a single dye and a brick to create a colored brick pattern.
- Vine: Crafting a vine, a dye, and your banner will create a wavy border in the color of your preference.
- Creeper head: This gives you a Creeper-like confront on the banner, in the color of your choice.
- Wither skeleton skull: Use this to create a skull and crossbones design.
- Oxeye daisy: This provide a vague bloom shape.
- Enchanted gold apple: Use this to get the Mojang logo.
Remember, you can craft dyes on a banner multiple times! This allows yous to complement and overlay designs to get just the look that you want. If you want to experiment first so you don't waste any materials, Minecraft has a tool for that very thing. People accept created everything from existent-globe national flags to the crests of the Houses in Game of Thrones, then y'all can detect enough of practiced advice for more complex plans.
If you have access to a loom, you tin can create fifty-fifty more imprint patterns with a wider variety of logos, just this is not necessary to become the look your desire.
Step 4: Place your banner

With your dyes and blueprint crafted, you are prepare to place your banner in the desired location. Banners accept no collision mechanics and are placed either on the ground (like a sign) or on a wall. Lava cannot hurt them, and objects motion correct through them if necessary, including running water.
Step 5: Arrange multiple banners if necessary
Sometimes 1 banner isn't enough to get the exact expect you lot want, especially if you want to spell something out or create a large billboard. For this, you lot will need to create and place multiple banners in the same position, using their color patterns to class a larger design.
If you want to create a banner with the same colors, simply put a blank banner and your dyed banner into the crafting grid. This allows you to re-create the blueprint without needing to gather all the materials again.
Editors' Recommendations
- Everything to know about Fortnite Chapter 3, Season 4: Paradise
- What is Discord?
- Destiny 2: Where is Xur for the weekend of September sixteen
- Splatoon three: Best abilities in the game
- Splatoon three beginner's guide: 6 tips and tricks to go started
Source: https://www.digitaltrends.com/gaming/how-to-make-a-banner-in-minecraft/
Posted by: fieldsforet1986.blogspot.com
0 Response to "How To Make A Villager Banner"
Post a Comment